Showing posts with label diy. Show all posts

Sunday, July 14, 2013

Operation DIY Iron Bed Restoration: In Progress


So remember that pretty antique iron bed I lucked upon for $25 while surfing craigslist late one sleepless night? Yeah, that one. Well since getting a power wash last month its been sitting in the backyard awaiting further restoration... and gaining a new layer of rust thanks to the crazy amounts of rain we've been having.

I had a 4 day weekend over the holiday and started my juice cleanse so I figured I'd use some of my free time to clean up this pretty bed some more.
My brother suggested Naval jelly so I went to Lowe's and grabbed a bottle along with some wire brushes to scrub the whole thing down.
I wore rubber gloves and used an old paint brush to apply the jelly liberally all over the bed. I applied the jelly in section, working 1/3 at a time along the bed from one side to the other.
As you can see above- the left side is after the application of the Naval Jelly and some serious scrubbing with the wire brush and then a good rinse with the hose on the concentrated setting along with more scrubbing to get the Naval Jelly washed off. 
         Rust and paint gone.........................................Rusted and weathered.
Before
After

So, once I got the foot board, head board and rails all cleaned up... I spent several hours in web searching for tips and in trips to Lowe's trying to decide how to proceed in sealing and painting it. 

I really want to paint it a light gray. Like a pale heater gray but because I was trying to stick with spray paint, particularly Rustoleum I was limited to a very small color palette... not ideal for an artist like me! So I ended up trying a Rustoleum Rust Seal in Black to seal it and then after even more time standing before the wall of spray cans at Lowe's narrowed my colors to pale blue, pale yellow and green. 
 After some votes from my instagram friends I went with yellow.


And hated it. I just couldn't see it in my room wiht my decor as much as I wanted to. And more so I really didn't like the finish it left, showing every imperfection from the pits and chips left in the wrought iron. I returned the other 4 paint cans, also because SO MUCH paint just blew away in the wind, it felt like such a waste, so I am back at square one and if I can ever find an oil based enamel will be getting the light heather gray color I want and brushing it on instead. 

For now, the bed is now out of the weather and safely waiting further beautification in my studio. I was a little put out, having really wanted to finish the bed over my holiday but things don't always go as planned. So another day.


Anyone have experience refinishing an old iron bed? Or something similar? I would love ideas and suggestions! 

Thursday, June 6, 2013

Thrifty Thursday: A Dresser Makeover!

It's Thrifty Thursday and I had to reach deep into my photo archives for this one as I haven't photographed my most recent thrifting cache from a few weekends ago!

But don't worry, this is one of my favorites so I am more than happy to share!


As you might have read a few days ago in my post A China Press Makeover , I completely revamped my room about 5 years ago when I was home from college one summer. 
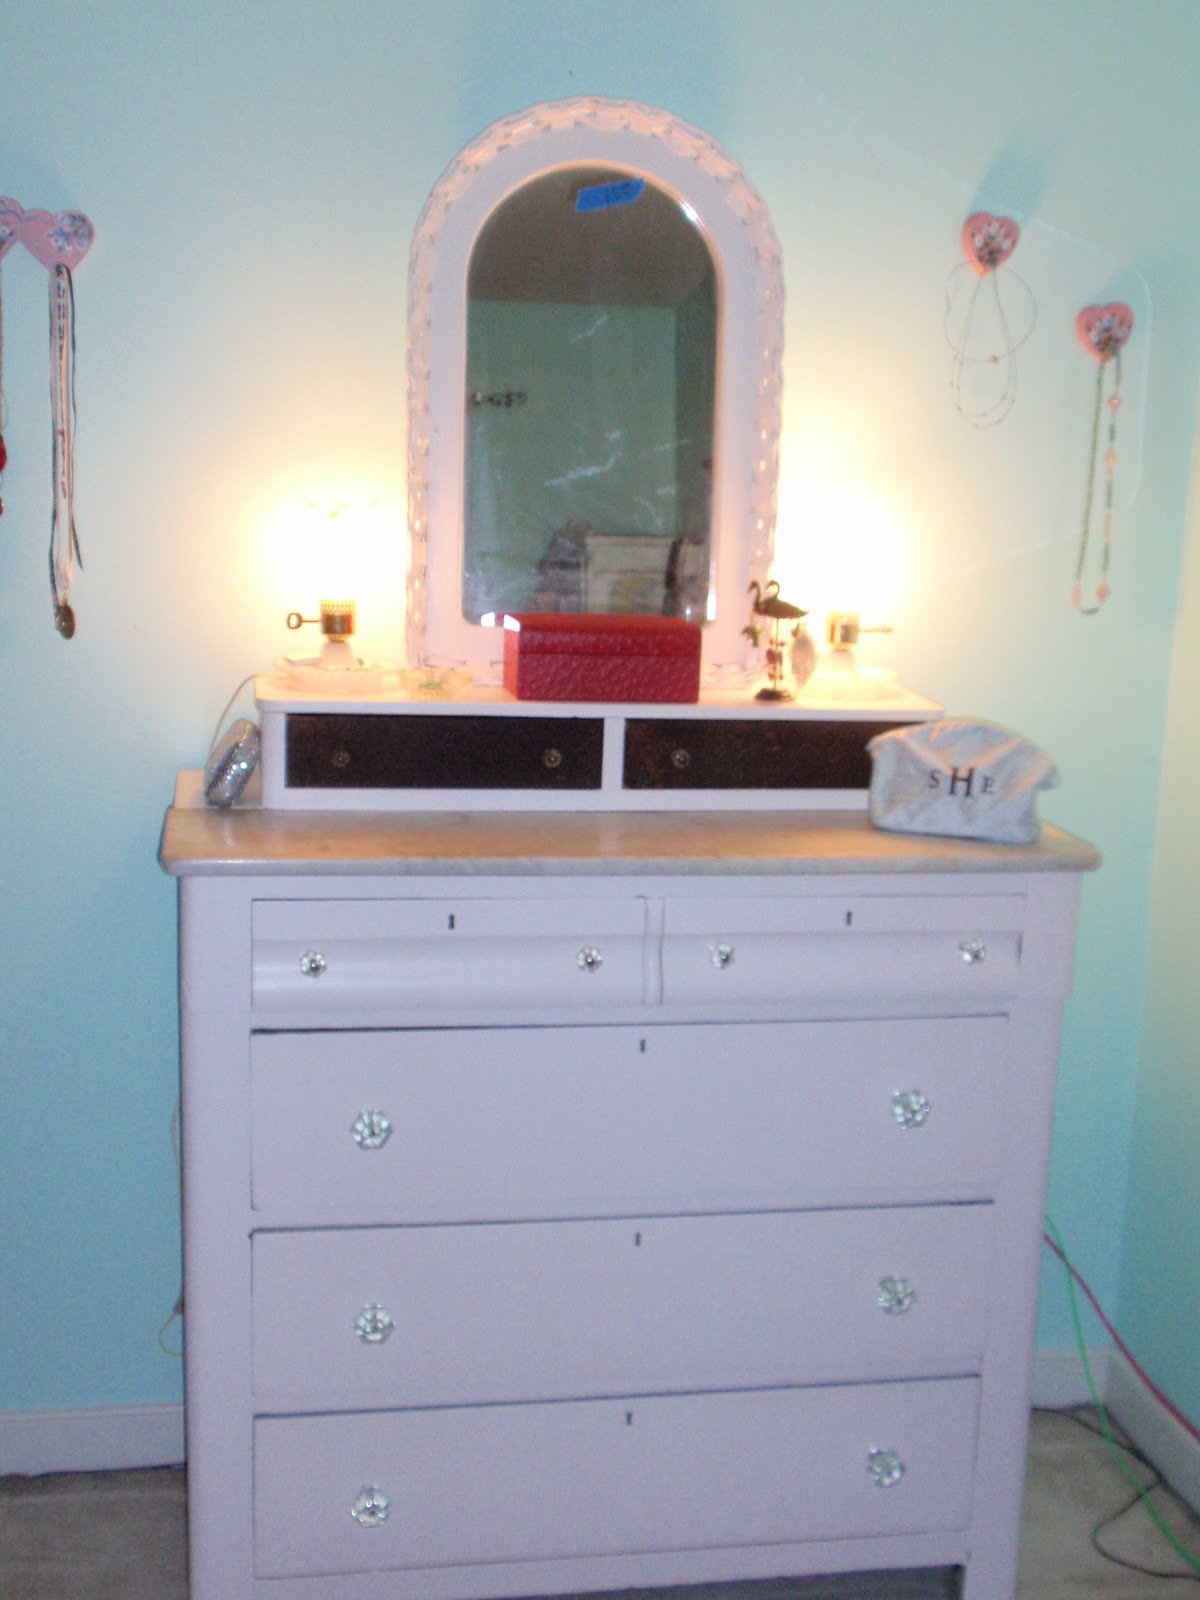
I came across this dresser by looking through craigslist. There was no photo, just a description for an antique dresser with marble top and crystal knobs that would be for sale at estate sale the following saturday. That saturday morning I work up early and coerced my mom into going with me downtown to where the sale was. 

Fortunately we got there before they opened and were the 1st ones so when the older couple who were really just having a small garage sale opened their door I asked about the dresser and was shown inside to view it. It had original glass/ crystal knobs, key holes in all the drawers, dovetail jointing and was solid wood, I was sold and asked how much? When they said $65 I almost started jumping up and down!

Not 10 minutes later while loading it into my Dad's SUV 3 other people had come and asked about the dresser! There is truth in the statement "The early bird catches the worm!"

I only took a before pic of it with my old cell phone at the time and have no idea where that photo may be so I only have it post sanding. 


(pardon the blurry cell phone pictures... they were all I had of the before)

It took a lot of elbow grease with this little lady, but after 2 days of sanding and sanding and more sanding... I primed her twice with Kilz and then painted her in a pretty white that had just a hint of pink in it. 


I cleaned the crystal knobs which were a bit dirty and the marble top and she looked perfectly shabby chic when it was all said and done! I purposely left the top two drawers the original wood veneer because a) i couldn't for the life of me get the smaller knobs off b)the veneer was in almost perfect shape and c) I liked the character it added, hinting at its former life while showing off its new style! 


Friday, May 31, 2013

A China Press Make Over!

4 or 5 years ago I came home from college for the summer, looked around my bedroom and decided, "This furniture needs to go!"
It was black with mirrors covering the front of every surface and while it had been awesome for sleep overs in middle school when we'd do make up and hair, it just multiplied any mess in my room because of the mirrors all over the fronts of the drawers and cabinet doors.  
So I took photos of it, put it on craigslist for sale and got it gone!

And with the cash I made combined with some of my savings and some $ from my parents, I revamped my room for under $500. One of those purchases was this lovely China Press that I found on Craigslist and paid $115 for!


I really liked the color it was but it smelled of smoke and the inside was too dark so I took to it with a bucket of hot water and Murphy's Oil and scrubbed the dickens out ot if!

Seriously, I scrubbed that thing all over at least twice and went through about 50 q-tips cleaning decades of grime out of all those intricate nooks and crannies. Needless to say, there was a lot of junk that came off of it. 

Than I painted the inside white. I knew from the moment I'd seen this cabinet online that I wanted to use it to display some of my pottery and vintage cameras and that if the inside was white everything would stand out much better!

I put two coats of primer on and then used some left over white with a pale pink hue that I had gotten for another piece of furniture to paint and went to town. 

The end result was exactly what I wanted!
 It brightened the whole piece up and gave me a great way to display some of my collected treasures!
Not to mention became a favorited piece by all of my friends! I have had at least 4 friends ask me to please let them know if I ever decided to sell it because they would buy it from me. Cool! But no thanks gals, this one is a keeper for sure! :)

Thursday, May 16, 2013

Thrifty Thursday: One Man's Trash is SHE Design's Treasure!

So the 2nd or 3rd day I was in Florida my Aunt and I came across a back alley dumpster find chest of gold! Metaphorically speaking. 
We had just picked up a few pounds of shrimp for that evenings dinner at a small local market and left through the back alley only to come across (thanks to my Aunt's sharp eye) a huge beautiful framed mirror sitting next to the garbage cans! 

Say WHAT!? So we stopped and I got out to investigate. The mirror was clearly broken but I was focused on the frame. Was it solid wood or partical board... it was wood. Was it knicked up or in good condition... considering its location, it was in good condition. So we loaded it into the back of my Aunt's little Prius (thank you Jesus that is just barely fit!) and saved it from a doomed existence in a pile of garbage at the dump! 


This picture really makes it looks small.. it is not.. the frame is a good 4 x 3 1/2 feet. 
The great thing I discoved while investigating in the alley was that the mirror while cracked, had some kind of heavy duty plastic backing which is why it was still holding together. So we took the whole thing not wanting to leave a jagged mess for someone else to clean up in a back alley and layed it on a tarp in the driveway to deal with the mirror. 

 My Aunt and I put some tape across the front of the mirror just to be safe... 
And then we pulled out all the staples around the back of the frame. After that we were able to just lay it down gently and the mirror fell out the back in one piece! (I failed to snag a picture of that)
 So then we just folded the mirror over a few times and threw it in some heavy duty trash bags and into the trash!
 And what was left is this awesome frame!
 I'm 5'11 so as you can see.. this frame is pretty big! Pardon the horrible shot.. I was snapping the picture with my remote shutter release at the same time I was holding the frame up!

I'm not sure what I'm going to do with it yet... there are just so many possibilities! So for now I think it will become one of my photo props but in the future when I get my own place I'm thinking I'll hang it up and put a bunch of smaller framed and un framed photos and paintings inside of it!


Tuesday, May 14, 2013

Beachy Chic Roomspiration!

I can't help but be drawn to beautiful shabby chic/ beachy chic places. Its like I have an internal compass for finding these places. And as much as I enjoy a walk through of a more typical place like Anthropology, I appreciate much more the small individually owned shops where I find equal if not sometimes better ideas! 
So of course while toodeling around St. George Street my 1st day in St. Augustine, I spotted a shop full of shabby chic beauty. Ironically all the things I would have bought in that shop were just display devices for the jewelry being sold.. but I snapped some pictures knowing I can file it away into my ideas folder for future spaces and DIY projects in my home!

 I LOVE how they used these big hemp ropes to create visual interest and texture and add a little ocean voyaging vibe! And of course the off white and oceany sea foam furniture!
I also loved all the beautifully shaped and sized glass bottles they had everywhere to display necklaces. 
And can we just talk about that white washed wood plank floor! Gorgeous! 


They also had some lovely abstract, richly hued paintings by a local artist that gave me some idea's for future paintings of my own! 


My apologies for the poor photo framing.. I was kind of taking quick snaps because it was one of those shops where I felt like I might get yelled at if they saw me taking pictures! 


Tuesday, April 23, 2013

Candied Violets

So last week, while I was home one morning and taking my yorkie Fritz on a walk I had an internal dialogue with myself, this occur pretty often I must admit. But this one when something like this,

"Those are violets that grow like weeds in our yard, right? That's what Dad calls them, I think. (pause) Aren't violets edible? How could I use Violets in something?"
 (long pause as I continued to walk with Fritz) 
"Wait! Violets are one of the flowers commonly used for candied flowers! Like at For The Love of Chocolate in Carytown. And they are so crazy expensive there! I wonder if I could make candied flowers? I'm sure I could make candied flowers! And they'd essentially be free! I need to go do some research on edible flowers and candying them!" 

And then I quickly turned homewards with Fritz to do said research! And all of my thoughts were correct and the little purple flowers growing like weeds in my yard are in fact common violets and you can indeed eat them (Warning: if your yard has been chemically treated DO NOT use any edible plants from your yard for consumption! Our's hadn't been treated since well before winter so I went for it) and they can indeed be candied if you have the patience to do so!

So while it was still early and the violets hadn't yet been hit by full sun and gotten wilty I went outside and picked probably close to 100. I have an issue with quantity when it comes to projects like this, I always go for "MORE if more" over the Less if More and always pay for it in the end. 


The rest is pretty simple but is not for the impatient. This is a tedious and time consuming task so for a 1st time I'd start with 20 very nice looking Violets as large as you can find from a safe area that has not been treated with chemicals or pesticides and is not close to a road or busy traffic area as exhaust fumes can be absorbed into surrounding plant life making it unsafe for consumption.

Now I looked through a lot of different "candied flower" recipes and found two common themes for creating the glue that will adhere the sugar to the petals. I used the more old fashioned one because I had it readily available and because I eat raw cookie dough and cake batter but if you plan on serving someone who may be pregnant... go for the simple syrup instead of the egg white glue. 

Candied Violets Recipe: For Approximately 20 candied Violets
* Use only common Violets like the ones you see pictured here, Do Not use the more indoor common African Violets- those are for looks and not eating! 

Version 1 
20 freshly picked and washed violets with stems on- atleast 2 inches of stem
1 Egg white- from eggs you trust- beaten just til frothy. 
1/4-1/2 cup white granulated sugar
1 clean small soft bristled paint brush
Parchment Paper
2-3 toothpicks
Small Scissors (for trimming off stem once candied)
Patience

Version 2
Simple Syrup- to make put 1 cup water in small pan and heat to warm not boiling- then add sugar starting with 1/2 cup and stir until dissolved- continue adding until sugar no longer dissolves- you have simple syrup!
Everything in Version 1 minus egg whites. 

1st- clean your violets! However you rinse them make sure they get a good rinse and under a gentle flow of cool water, shake off gently then place on paper towels and allow to dry for 30 minutes. 

Now, assemble your Candying station- I recommend sitting down at a table. Have a bowl for your sugar, bowl with your "glue" of choice, paint brush, a plate to work on the violet and a lipped baking sheet to place the finished sugared violets on. 

Pick up your violet and brush each petal front and back with the liquid glue. Then sprinkle sugar over petals to coat, front and back... may need to touch up in areas brush missed. If flower looks wet after coating with sugar, coat it again. Once flower is nice and coated carefully lay it on parchment lined baking sheet and arrange petals face up how you'd like it to dry (enter tooth picks)- then snip off the stem with scissors. 

Repeat for each flower! 

Once all flowers have been candied- double check to see if you need to sprinkle more sugar over any and then place in a dry cool place away from people and pets to dry for 24-48 hours. Don't cover with clear wrap- I did and when I checked them the next day they'd gotten floppy- need to be left to open air so flowers can dehydrate and set. 

Once stiff and dryed out place in an airtight container and keep for up to 1 month! 


Use them as a pretty way to sweeten your tea (remove after sugar has dissolved) or to top cakes, cupcakes or even fresh fruit! 

Basically, after going to the trouble I would say this was a fun project.. though I was at it for 4 hours because of the 80 some violets I sugared... I have a knack for choosing tedious tasks! But aside from how pretty they come out and harken back to Victorian times which is one of my favorite Eras. Candied flowers are basically a pretty way of transporting sugar to your mouth. Its really not worth the effort unless you have a particular use for them like above mentioned suggestions in which case if you are willing to sacrifice a few hours it is definitely worth it over the crazy expensive price to buy them in specialty shops and is a rather fun and meditative activity! 

You can also candy Rose petals, Carnation Petals, John Jump-Ups, Fuschia, Impatiens, Pansies, as well as herbs like mint and lemon balm leaves which are especially great to put in your tea both to sweeten from the sugar on it and flavor!

Play around, just BE SURE to use plants from areas you trust and that you have identified for SURE as being EDIBLE! A quick internet search will pull up a lot of sites that are focused specifically on Foraged Food and even mention the taste of each edible flower!

DO NOT use store bought unless they are Organic and you really trust the seller but personally even then I would not use store bought unless maybe I specifically went to a florist and got their ok as a seller and DO NOT use flowers that are growing in either a place you know has been sprayed with chemicals or pesticides or you are unsure of having been sprayed or is near a road!
 Always better safe than sorry so if it means foregoing then accept it and instead add some of the edibles I mentioned to buying list for your spring/ summer herb pot/ garden so you can know for sure what's going into their soil and being sprayed on them which should be nothing except water. :)